

In this article we will show you how to remove track changes in word, MS Word is a tool of the Microsoft office which is concerned with creating documents like resumes, assignments for school and college, an application form, a formal notice, softcopy of a formal speech, research paper, book, etc.
It is thus, used by millions of people all over the world and across all age groups for their personal and professional reasons and needs.
It offers a wide range of features and tools like tables, shapes, font, animations, etc. that help a user make their documents attractive, neat and wholesome.
If you want to learn how to remove the track changes in your MS Word document, you are at the right place.
Step By Step Guide On How To Remove Track Changes In Word :-
-
In your laptop or PC, click on the Microsoft logo located at the left bottom corner of the page. From the Microsoft office, choose the MS Word option.

- You can also access MS Word via your mobile phone using its app.
- Now open the document in which you wish to remove the track changes.
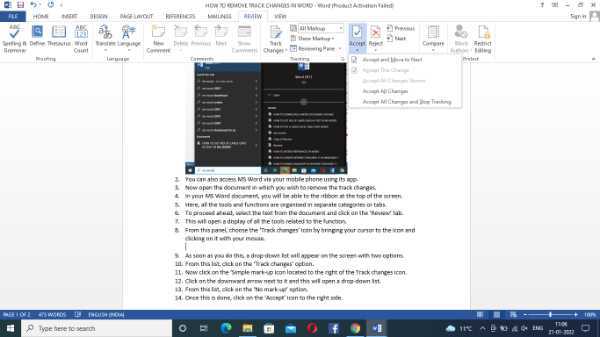
- In your MS Word document, you will be able to the ribbon at the top of the screen.
- Here, all the tools and functions are organised in separate categories or tabs.
- To proceed ahead, select the text from the document and click on the ‘Review’ tab.
- This will open a display of all the tools related to the function.
-
From this panel, choose the ‘Track changes’ icon by bringing your cursor to the icon and clicking on it with your mouse.

- As soon as you do this, a drop-down list will appear on the screen with two options.
-
From this list, click on the ‘Track changes’ option.

- Now click on the ‘All mark-up icon located to the right of the Track changes icon.
- Click on the downward arrow next to it and this will open a drop-down list.
-
From this list, click on the ‘No mark-up’ option.

-
Once this is done, click on the ‘Accept’ icon to the right side.
- As soon as you do this, a dialog-box will open on your screen notifying you. To proceed ahead, click on the ‘OK’ icon.
- Finally! The track changes will be removed from the document.
- Now, save the changes made to the document by simply pressing Ctrl+S or by using the File tab.
Conclusion :-
This is how you can remove track changes in your Word document. I hope this article on how to remove track changes in word helps you and the steps and mentioned above are easy to follow.


