How To Enable Print Screen In Windows 10
🕐 1 Jul 23

In this article we will show you how to enable print screen in Windows 10, Windows 10 is the latest operating system of Microsoft. Operating system is a software which manages all the hardware in your computer.
It communicates with hardware to ensure proper functioning. Windows 10 comes with many different features like the Edge browser, a virtual task manager. It also supports fingerprint and facial recognition. Windows 10 also comes with a new feature of screen snipping.
This new Screen Snip feature allows you to quickly snip and share a screen. The print screen key is the simplest way to take screenshots. You can use the Print Screen key to launch screen snipping and we will show you how.
This feature will let you capture a snip in any shape, you can even snip a freeform area. You can also use it for taking regular screenshots.
The good thing about this is that the snip gets saved directly to the clipboard which allows instant sharing. When you will take a snip you will get a notification which will allow you to edit the snip in the sketch app.
It’s very easy to use just click on the print screen key and snipping tool will appear in front of you. Now draw the shape you want to snip be it a rectangle or anything.
The screen snip will get saved, now you can tap on the notification to edit the snip however you want and then tap on the “save as” button to save the snip.
You can also use this snipping feature by pressing windows+shift+s in case you don’t want to enable the print screen key
The print screen setting is disabled in windows by default. You can enable it very easily by going to the settings. In this article we will show you how to do that.
Step By Step Guide On How To Enable Print Screen In Windows 10 :-
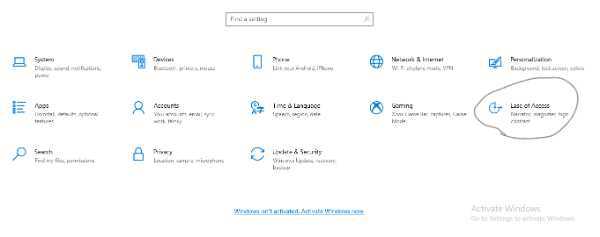
- Turn on your computer and open settings app.
-
In the settings you will find Ease of access, tap on it

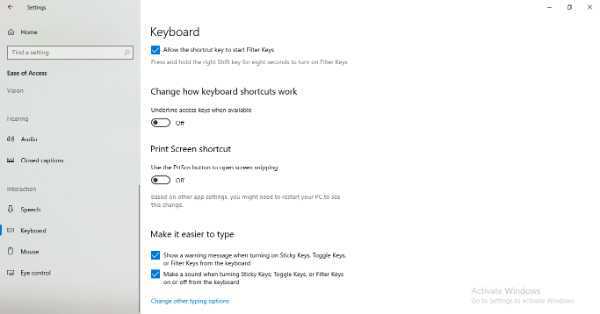
- In the ease of access Scroll down to find Keyboard
- In the keyboard settings scroll down to find Print screen section
-
Now all you have to do is turn on the Use the Print Screen key to launch screen snipping option and you are all set to use the screen snipping feature directly through the print screen key.

Note- If you want to take screenshot as an image file and don't want to edit any further you can do it simply window+print screen.
Conclusion :-
In this article we showed you how to enable print screen key to use the screen snip feature. This is a very handy feature.
It will help you to easily take screenshots, screen snips and also edit it at the same time. We have explained it in very simple steps. we hope this article was helpful to you. I hope this article on how to enable print screen in Windows 10 helps you.


