

In this article we will show you how to change margins in WordPad, WordPad is a text editor which is created by Microsoft. WordPad is free, installed in almost all the versions of the Windows operating system.
In WordPad users can easily edit and create a document with formatting and other punctuation features.
The users extensively used WordPad to create documents in different formats like rich text format which comprises images drawings and other objects.
There is also a possibility that a user may need to change the margin of the WordPad document in case the printer is truncating some data of the document if the margin is too narrow.
Here, the user needs to change the margins of the WordPad document in order to prepare it for the printing procedure.
There can also the other reasons to change the margins in the WordPad document to make the document appear more clutter-free as per your own needs.
In case you are looking for a solution on how to change margins in WordPad, this is the right article for you.
Step By Step Guide On How To Change Margins In WordPad :-
- Open WordPad on your PC.
- You can find this application by simply clicking the search bar OK your PC and typing WordPad.
- Click open or create a blank document in order to change the margins in WordPad.
- The WordPad comprises three tabs at the top of the screen. These cards are file, home, And view.
- Click the file tab placed at the top of the WordPad screen.
- A drop-down list will appear on your screen which will show various options including new, open, save, save as, print, page setup, send in mail, about Wordpad and exit.
-
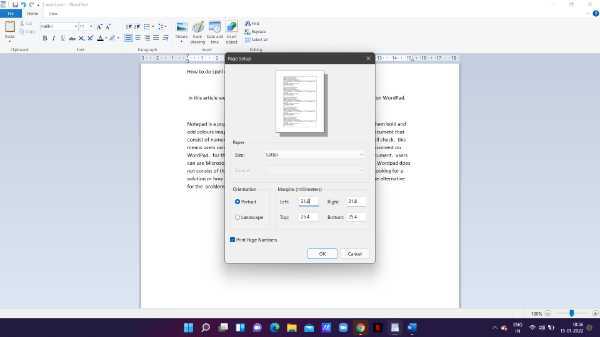
Click the option of page setup from the drop-down list of the file tab in WordPad.
- A Page setup Pop-up box will appear on your screen. It will show the options for paper size, orientation, and margins.
- Look for the margin options. Now set the value in the boxes of the margin section.
-
All the values in the margin section are in inches. Set the values for left-right top and bottom works as per your own requirement
-
After adding all the values in the margin section press ok placed at the bottom of the page setup dialogue box.

-
As you can see in the picture given below after putting the values for the margin column the margins are changed and look wider.
- In Wordpad users can also change the orientation from portrait to landscape from the orientation section. You can also change the paper size from the size option.
Conclusion :-
I hope this article on how to change margins in WordPad helps you in this article, we covered an essential guide and the steps mentioned above are quite detailed and easy to follow.


