

In this article we will show you how to change audio language in YouTube video as we know, YouTube is one of the widest and most popular online video platforms across the world.
Users of YouTube are increasing day-by-day by day because of rapid increase in the number of internet users. It provides you with videos of every type and every field in many languages.
Suppose if you're watching a video that is in English language and you don't understand English language clearly, then how will you understand its Audio. The one and only option remaining is to change the audio language.
Without changing its audio, you'll not be able to understand the whole video. So, if you don't know the method of changing audio and looking for a technique or method which can help you, Today, I will show you how to change audio language in YouTube Video.
You can watch and understand any video on YouTube by changing its audio language to your own language. If you like any video you can watch it online either in any national or international language.
Whenever you watch a YouTube video, you can see the CC and Subtitles option on the bottom your video. You cannot directly change the audio on the YouTube video.
But using Subtitles/CC, you can translate that Audio language to your own language. The translated text appears on the bottom of your video.
And you can easily understand the song's audio using this process. If you're looking for such a method, this article is specially for you.
Step By Step Guide On How To Change Audio Language In YouTube Video :-
Audio language in YouTube Videos can't be changed directly. So, you'll have to use the CC and subtitles option. I will guide you on the way to change audio language in YouTube Video.
-
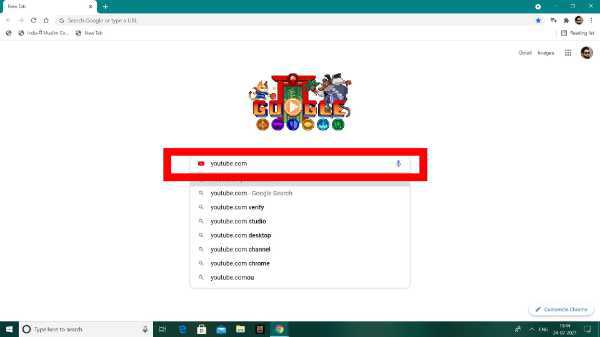
In the Search bar, search for Google Chrome and open it.

-
After opening Chrome, type youtube.com in the Google search bar.
-
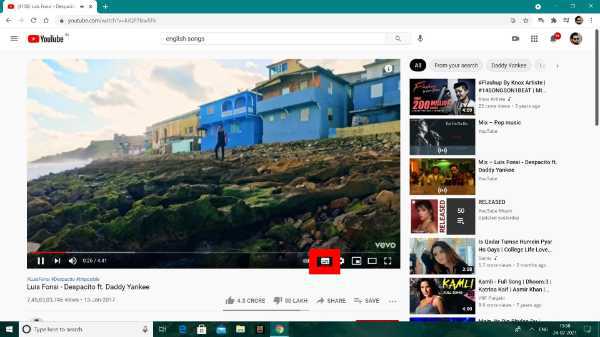
In the YouTube search bar, search for any English songs.

-
When the search results appear, click and open the song of your choice.

-
After opening the song, click on the CC and Subtitles option to on the subtitles.
-
After that, now, Click on setting

-
Now, a pop-up will appear in which you can see Subtitles/CC option. Click on it.

-
After clicking on Subtitles/CC, you will get a auto translate option. Now, Click on it.

- When you click on Auto-translate option, all the languages will appear.
-
Now, select Hindi among the languages. (You can select any language whichever you want).

-
Now, you'll see hindi subtitles on the bottom of your video. (You can get subtitles of any language whichever you will select from the Auto-translate language list).

Conclusion :-
So guys, these were the very simple and easy steps through which you can easily change the audio of any language in YouTube Video and can get subtitles in languages of your choice. I hope this article on how to change audio language in YouTube video helps you.


