
In this article we will show you how to access backed up google photos, this article will teach you how to access backed-up photos from your Google Photos using a computer, phone, or tablet.
If you already backed up your photos by signing in into your account this will automatically sync your images.
You can easily download your backed-up photos in a compressed Zip file and view, edit or store them desktop. And you can also download your photos from your Google Photos in the iOS and Android mobile app.
Step By Step Guide On How To Access Backed Up Google Photos :-
Method 1- By using Google Takeout on a computer
- At first, open https://takeout.google.com/ in your desktop browser.
- Now, a tab with a list of Google services which are linked to your account will appear on your screen.
- Select "Deselect all" a blue color option which at the top right corner of the data list.
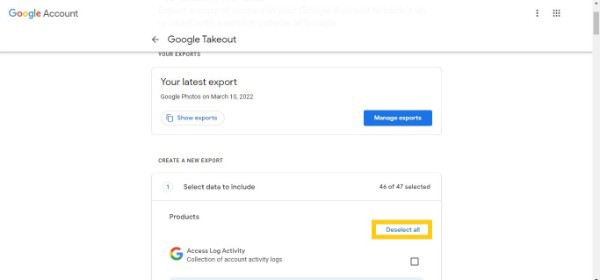
- This will deselect all the given data list.
- Now, scroll down to Google Photos option.
- And click on the box next to "Google Photos."
- This will turn the box into blue color.

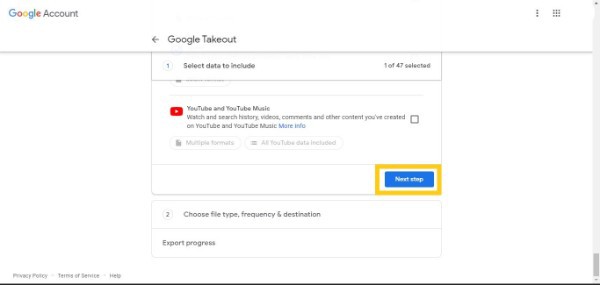
- Now, just select the "Next step" option which resemble the blue color button at the bottom of the data list.
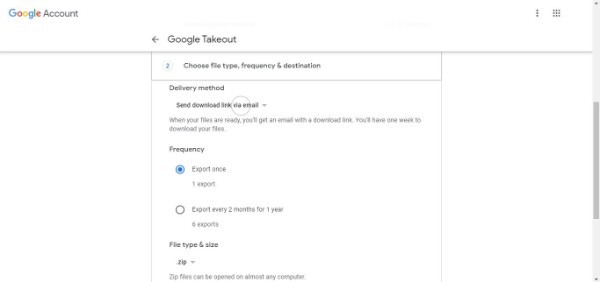
- After selecting the Next Step option, choose a delivery method which will help you to access you backed-up photos.
- On Clicking on the drop-down menu under the "Delivery method" you will get five options i.e. Send download link via email, Add to Drive, Add to Dropbox, Add to OneDrive, Add to Box.
- Select anyone of the option according to your choice. Here we'll go for send download link via email.
- After selecting the given option, now go the frequency section.
- This section contains two option i.e. Export Once and Export every 2 months for 1 year.
- After selecting the frequency, you also have an option to choose file types and size.
- Now, after setting up the all the respective options click on the Create Export option which is in a blue color button at the bottom right corner.

- Then, the Export progress will start and this will create a zip file of all your backed-up photos.
- And you will receive a direct link for download in your email id.
- When the export progress completed successfully a download option will appear on your screen.
- Click on the respective option to download the file.
- This will download a ZIP file into your computer.
- You can also download the file from the link which you have received in your email id.
- Finally, you can open the ZIP file on your computer.
And you will see that all your backed-up photos in the Google Photos and now you have an easy access to it.
Method 2- By using Google Photos on a Phone or Tablet
- At first open the Google Photos app on your smartphone.
- Select the Photos option which is at bottom left corner of your app screen in the navigation bar.
- This will show all the photos which are backed-up in your Google Photos account.
- Now, click on the photo which you want to download.
- Then, click on the three-dot icon which is at the top-right corner of your selected photo.
- After clicking on the three-dot icon, a slider will appear with a list of option from the bottom of the screen.
- Now, select the download option among the other given option on the app screen.
Conclusion :-
By doing this the selected photo will be downloaded instantly in your smartphone. I hope this article on how to access backed up google photos helps you.


